# Geometry Fix tab
This part of the workflow seeks to automatically identify and correct typical drawing errors. Once complete the model geometry can be previewed and “baked”.
Tip:
The term Bake is used within Rhino to refer to geometry that is created in Rhino from Grasshopper, which can no longer be modified directly within Grasshopper.
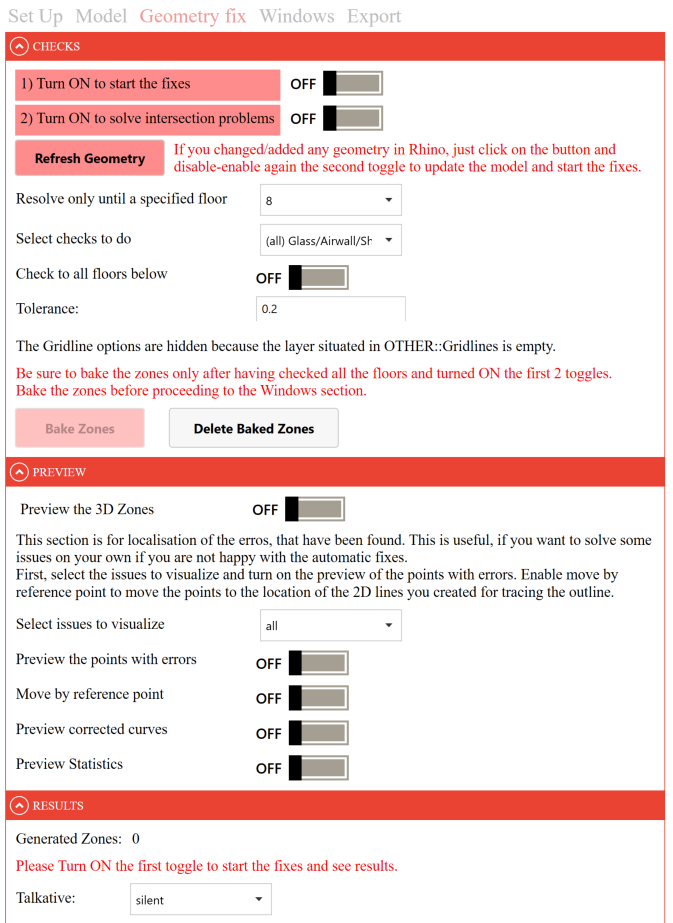
# Checks section
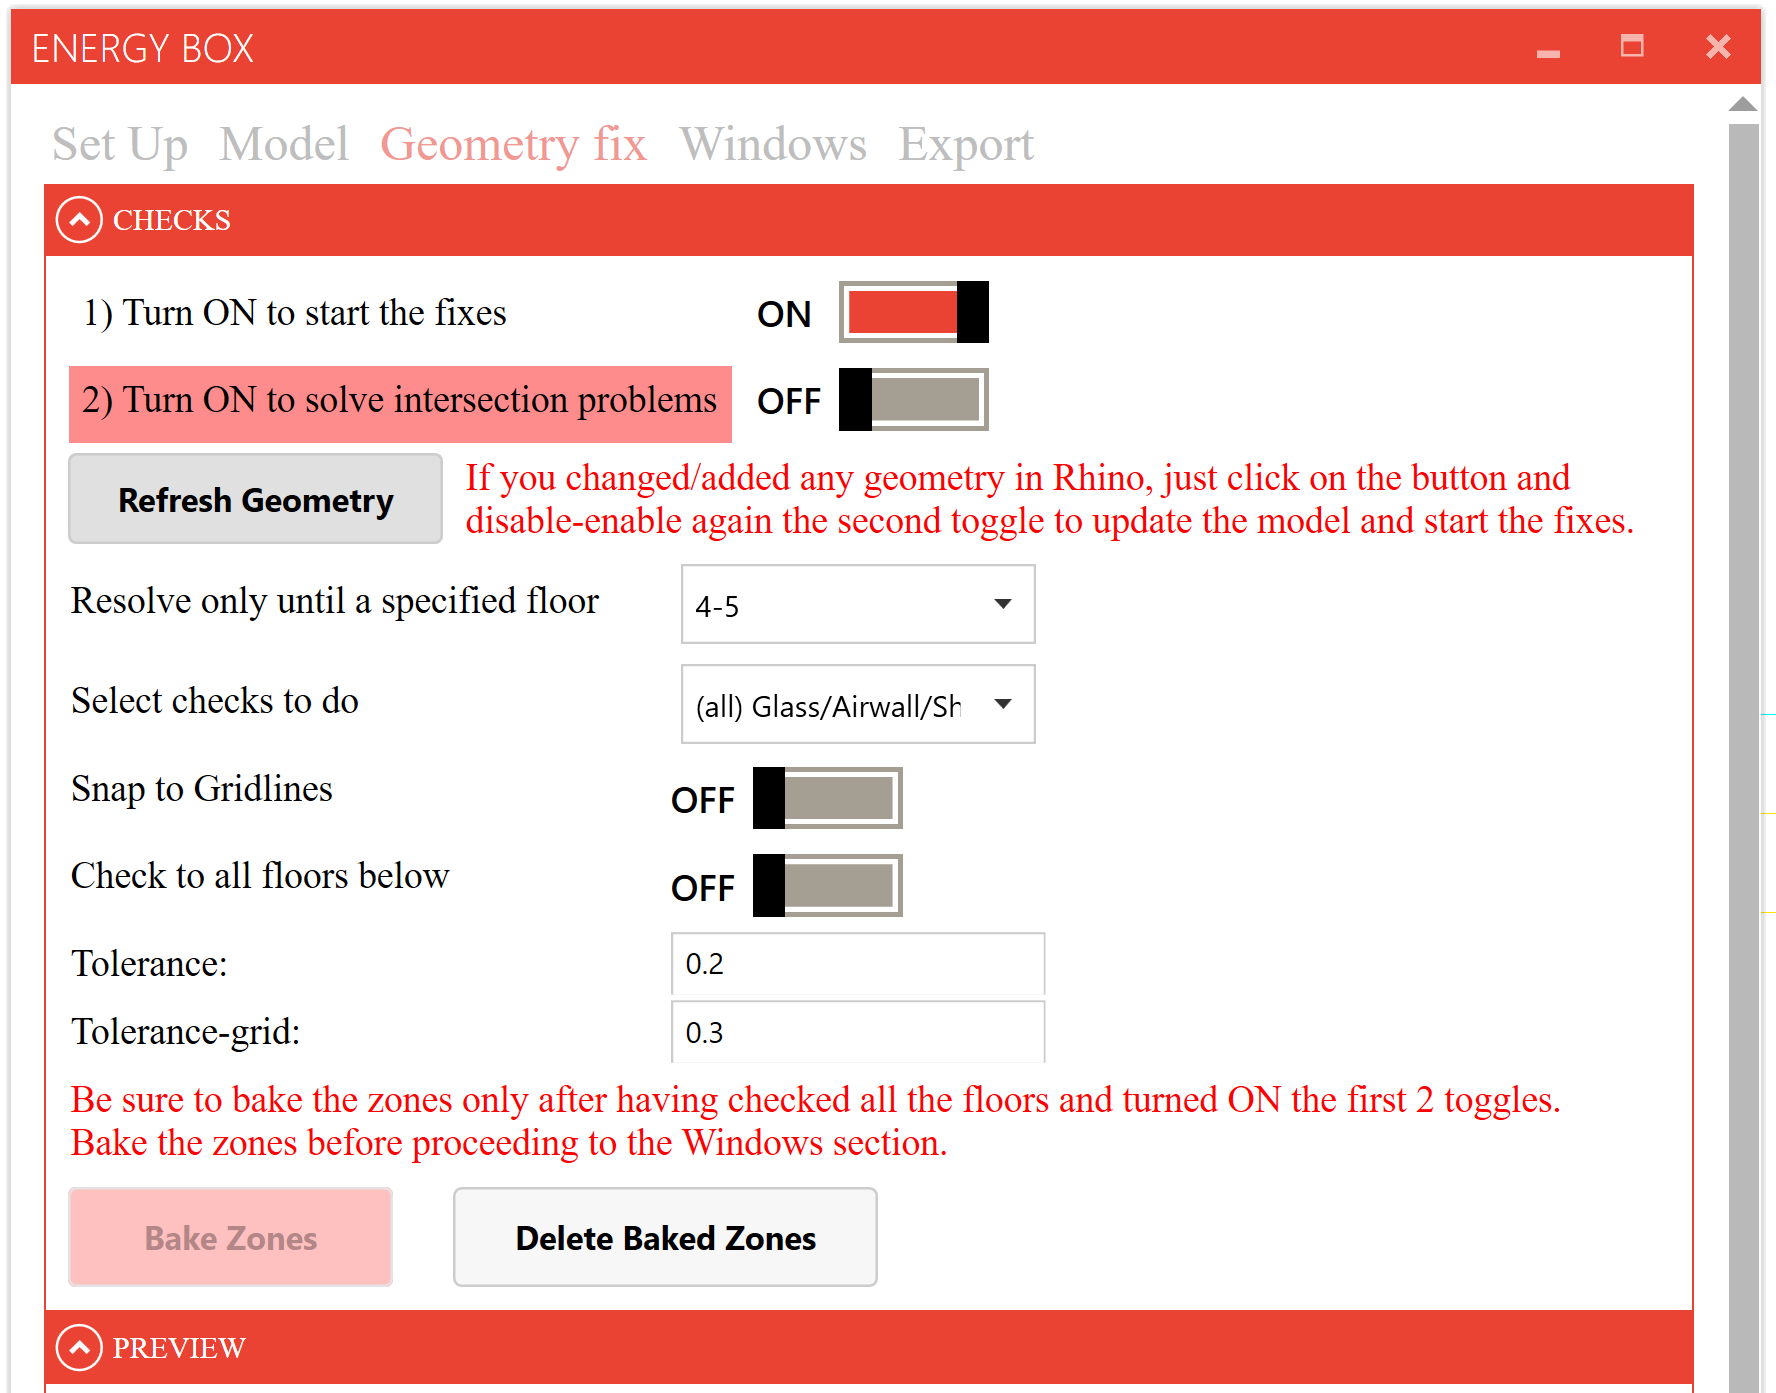
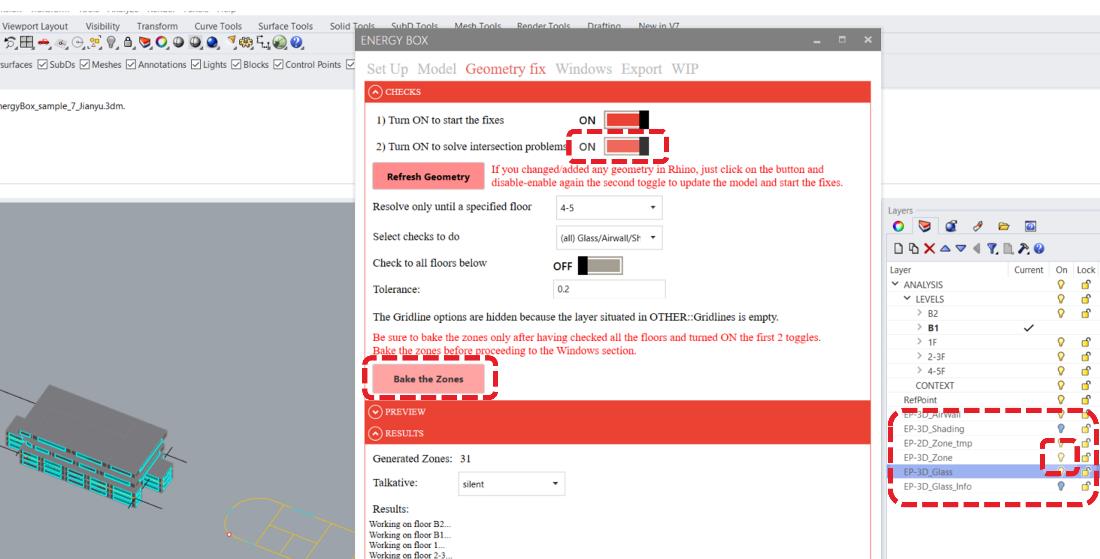
Within this section, the two compulsory fields are the first 2 toggles (first Turn ON to start the fixes and then Turn ON to solve intersection problems), which take care respectively of starting the checks of the 2D geometries that were drawn in the previous step and solving possible intersection problems between adjacent curves.
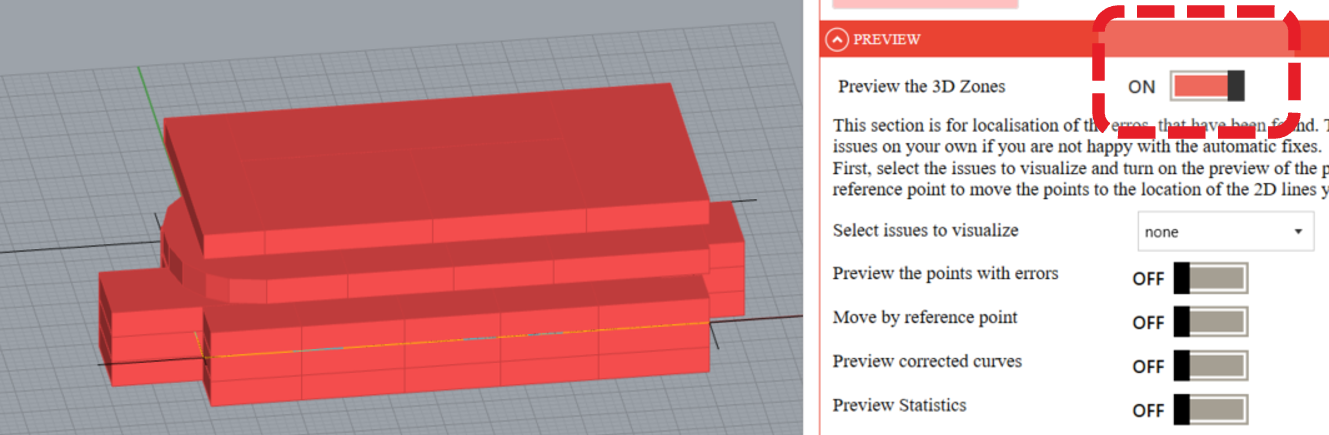
Once both toggles are set to ON, if the user does not want to make any further checks, it is possible to have a direct 3D preview of the Zones by using the toggle Preview the 3D Zones in the Preview section and to Bake Zones to proceed to the Windows tab.
Tip:
If issues arise with floors visualization or alignment in the 3D view, we recommend to adjust the tolerance from 0.2 to 0.3 or move the reference points.
# Refresh Geometry button
In case the user realises that changes are required to the model, the following steps can be taken:
Make changes → click on the Refresh Geometry button → deactivate and reactivate the second toggle in this section which deals with resolving possible intersection problems.
# If the user is interested in doing a more accurate check of the drawn geometry, then several options are available:
Resolve only until a specified floor
In this drop-down list you will find a list of all floors within your building.
The geometry is checked from bottom to top, so if you choose the last floor, everything will be checked. By default the last floor will be set as the first option.
Select check to do
Once the first toggle of the Checks section has been activated, inside the Geometry Fix tab, it is possible to choose the type of check to run. By default this option will be set to "All".
However, should it be necessary to investigate specific error, these can be selected using the drop-down menu.
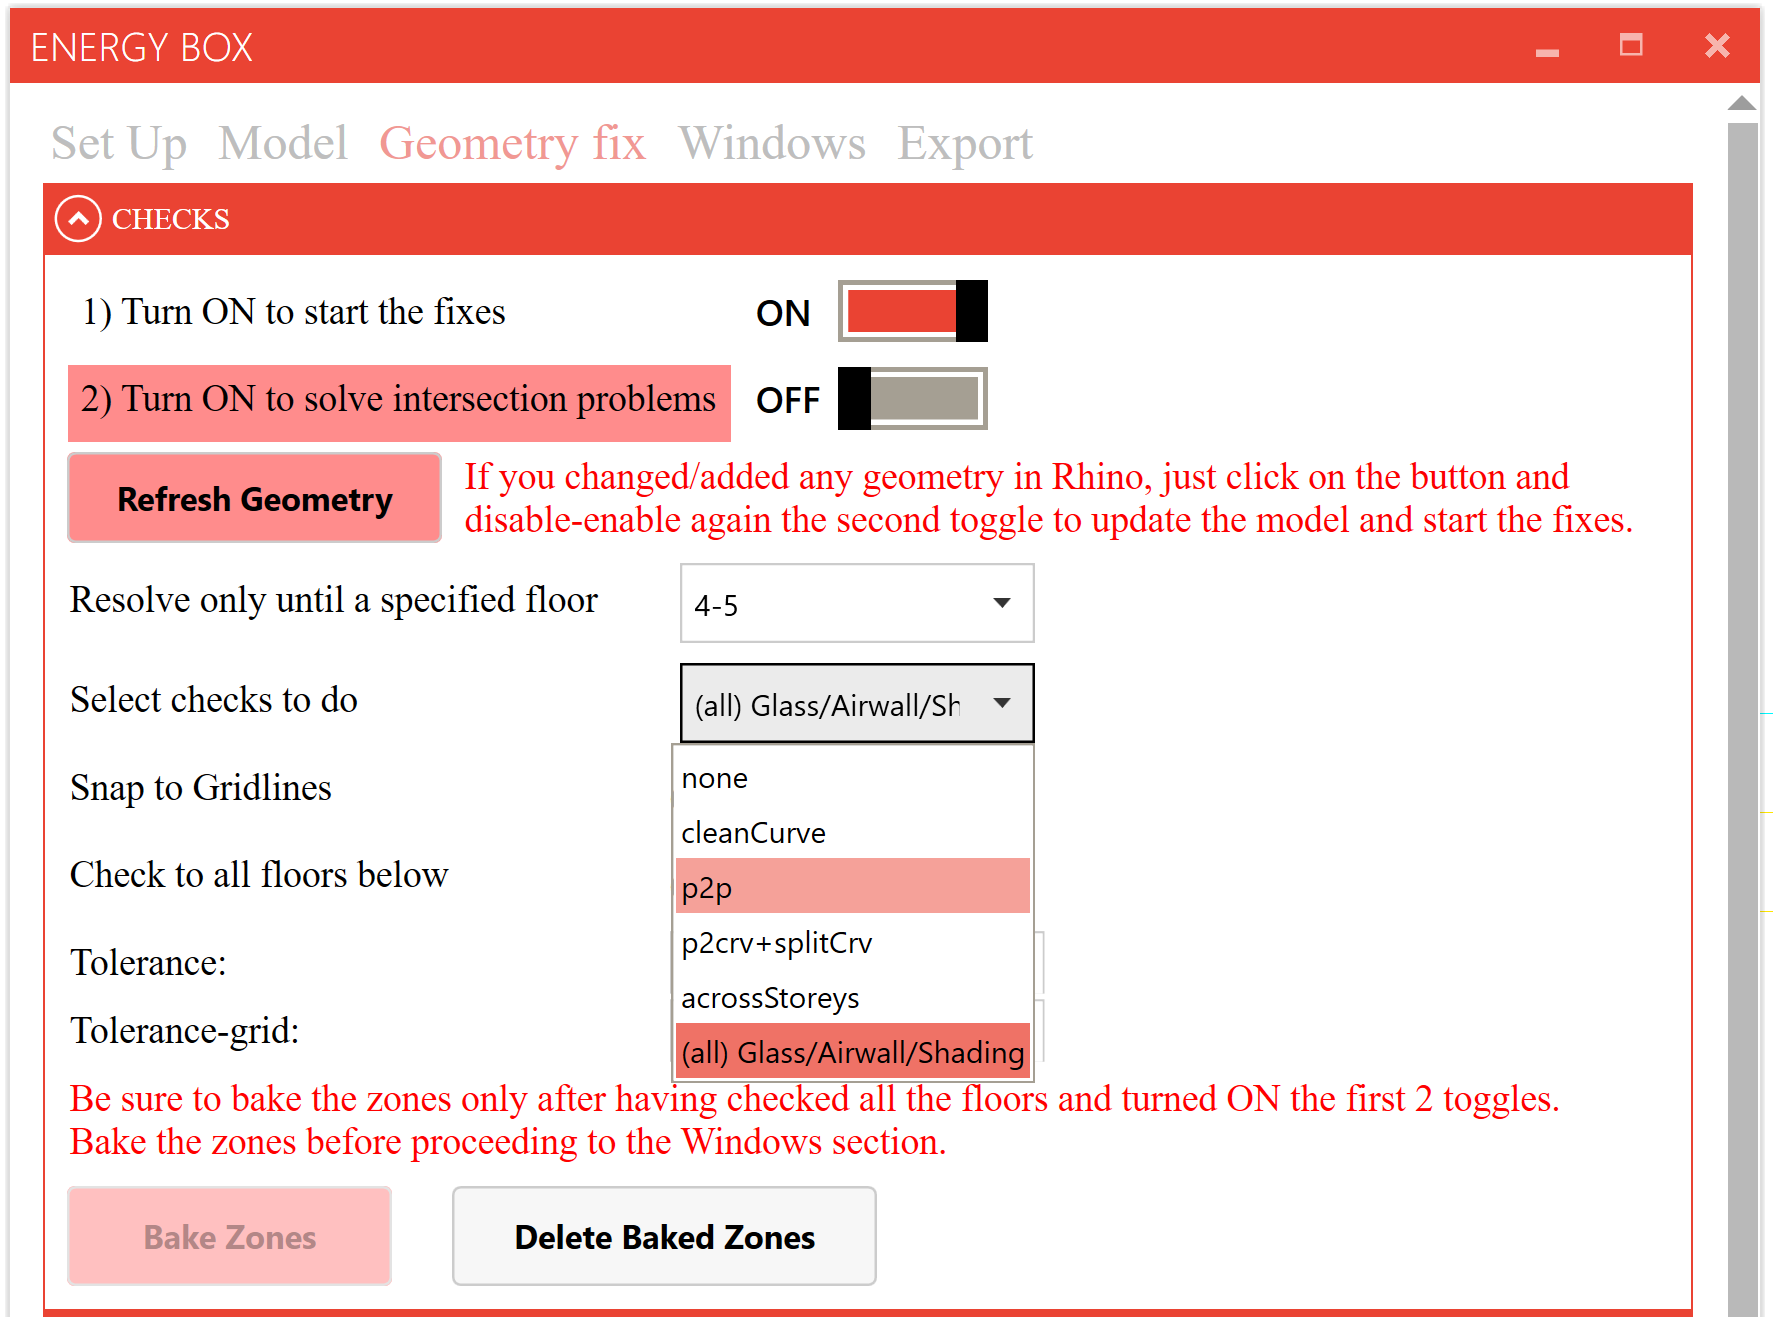
The following errors can be detected:
Clean Curve: looks for curves that have polyline points that are closer than the tolerance to one another

P2P: explodes the curves to its polyline points and checks whether any points are closer than the tolerance. If so, the points are unified (both Clean Curve and P2P will be checked)

P2crv + split Crv: snapping of points to curves and splitting curves where different polylines meet

Across Storeys: checks for p2p issues to the floor(s) below and checks for points from the current floor that are closer than 0.3m to curves from the floor(s) below
(All) Glass/Airwall/Shading: drawn geometry is snapped to the exiting zone outlines of the current floor. Also, the zone geometry needs to be split at the points where airwalls are.

Gridlines
If snap to grid lines is activated, the error checking algorithm will snap to the Gridlines drawn by the user with another tolerance than the default tolerance, using the value inserted in the Tolerance-grid field.
It will prefer to snap to end or control-points of the lines. This snapping will happen on all floors, therefore it is vital to provide the information relative to which floor the grid lines are drawn.
You can have a preview of the Gridlines in all floors by turning ON the toggle "Preview all floors’ Grid" in the Preview section.
Check to all floors below
Normally, when looping through the floors, the current floor only snaps to geometries from the floor below. The user can specify that snapping to all floors below is done.
This feature is not to be confused with the "Resolve only until a specified floor" drop-down menu, because here what is changed is only the snap of the geometries, which will be extended to all floors below the floor currently selected in the drop-down menu.
Tolerance
The distance threshold for snapping of geometry
Tolerance grid
The distance threshold for snapping to grid lines.
# Bake Zones
Once all necessary checks have been made, the 3D model can be previewed by switching the toggle Preview the 3D Zones in the Preview Section to ON.
If the model is correct, press Bake Zones to generate the geometries within Rhino, which will automatically be placed in the EP-3D_Zone layer.
Inspect the model to ensure everything is correct. You can toggle the highlighted layers by clicking on the highlighted bulb symbols to ensure that individual geometries have been correctly rendered.
Tip:
If the initial geometry has been changed, click on the Refresh geometry button, then turn OFF and ON again the Solve Intersection toggle, press Delete Baked Zones to delete previously baked geometry and then Bake Zones again.
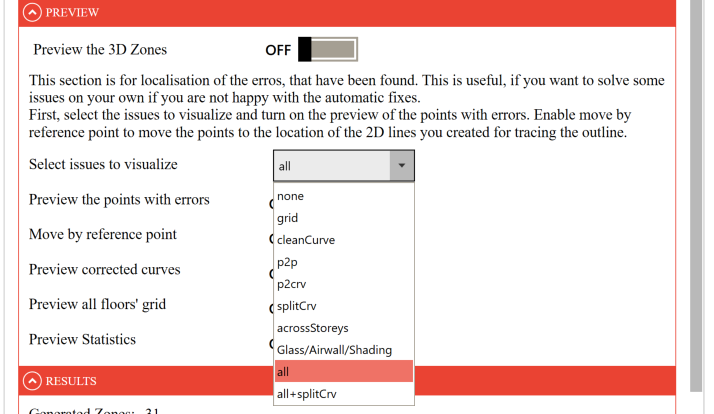
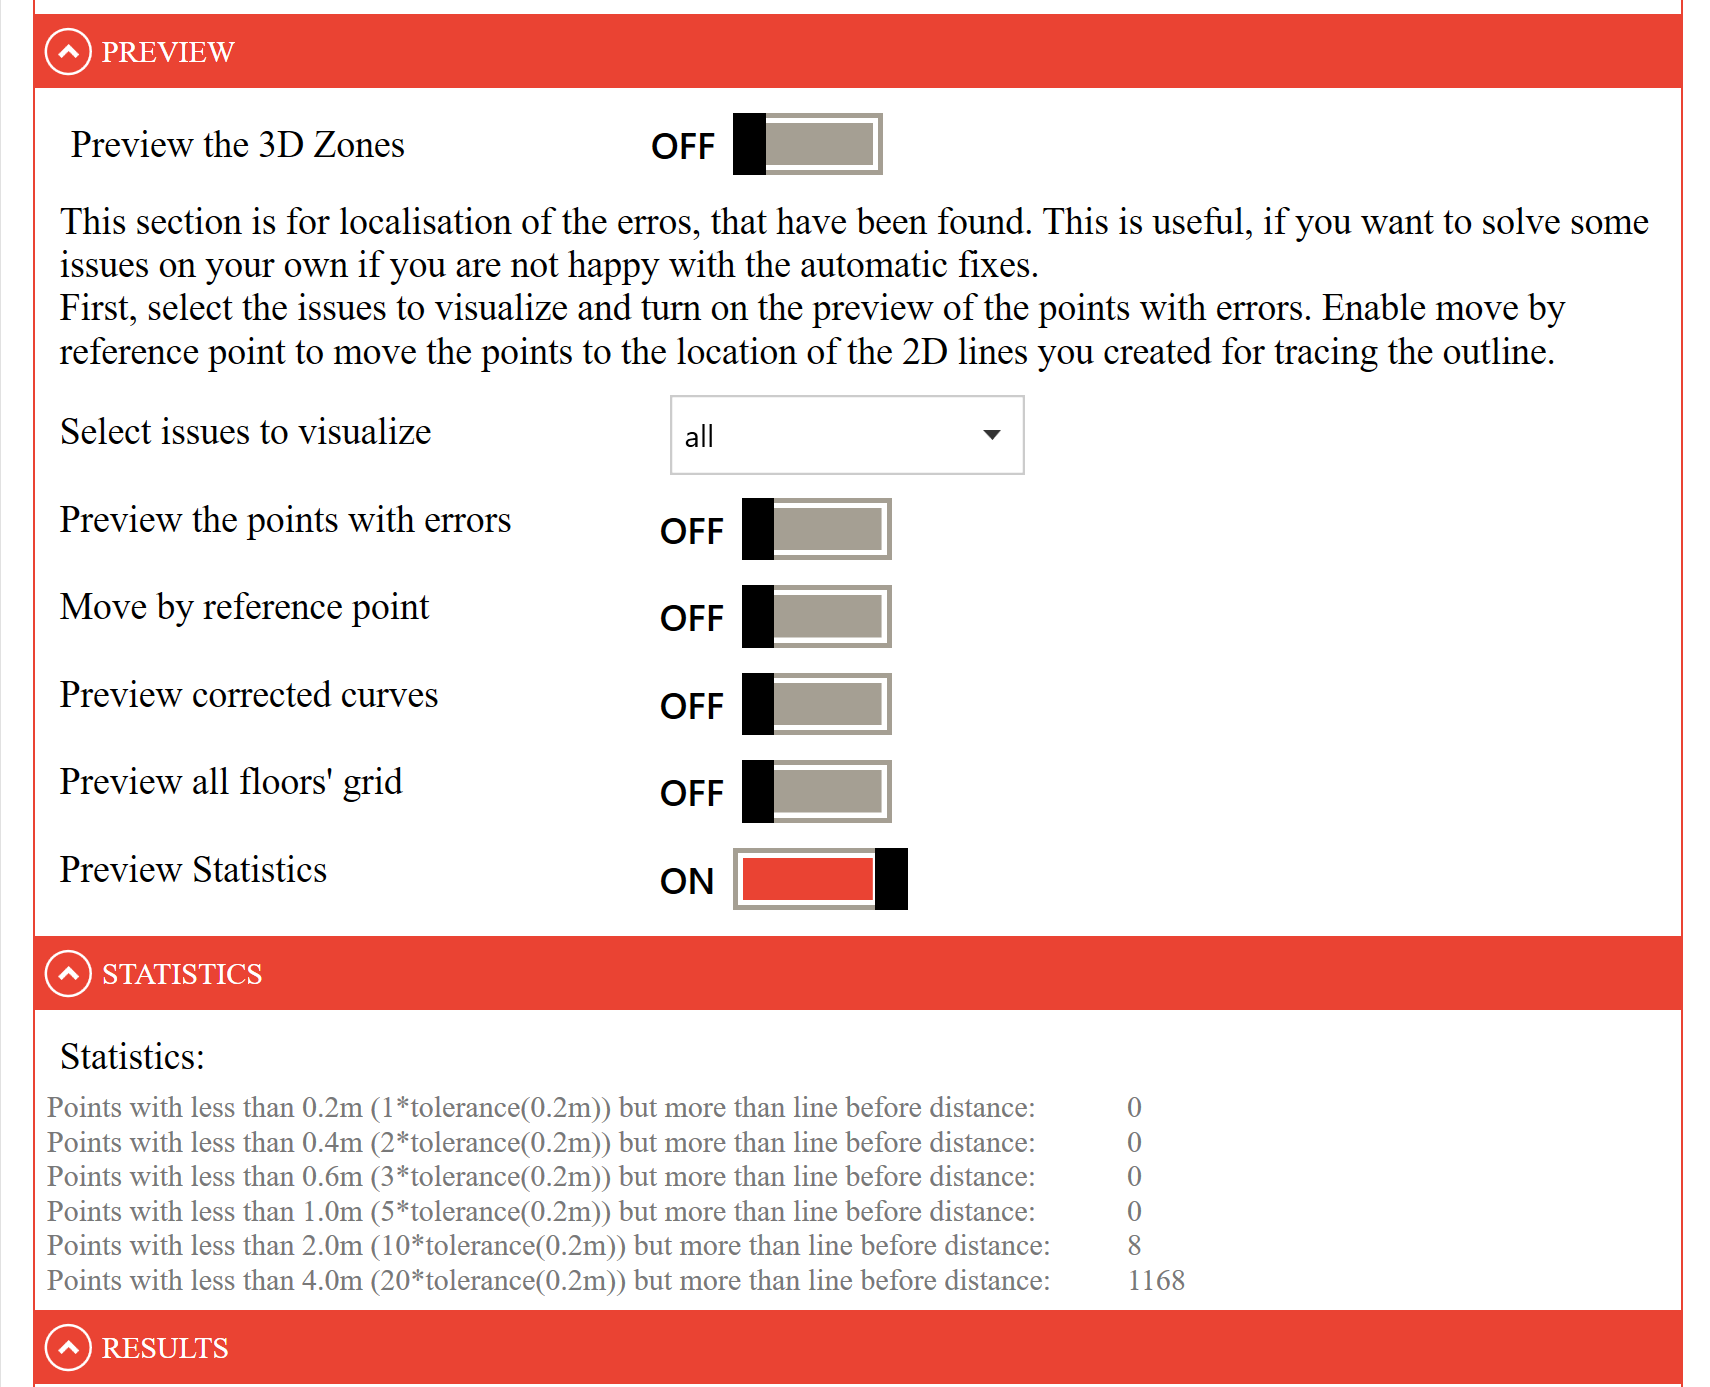
# Preview section
This section is for localisation of the errors that have been found. This is useful if the user wants to solve some issues or if he’s not happy with the automatic fixes.
Tip:
Previewing the errors is optional, and can be skipped if no problems are encountered in the model.
Preview the 3D Zones: This toggle gives the option of displaying the Zones drawn in the DRAW section, is useful for checking the geometry before pushing the Bake Zones button in the Checks section.
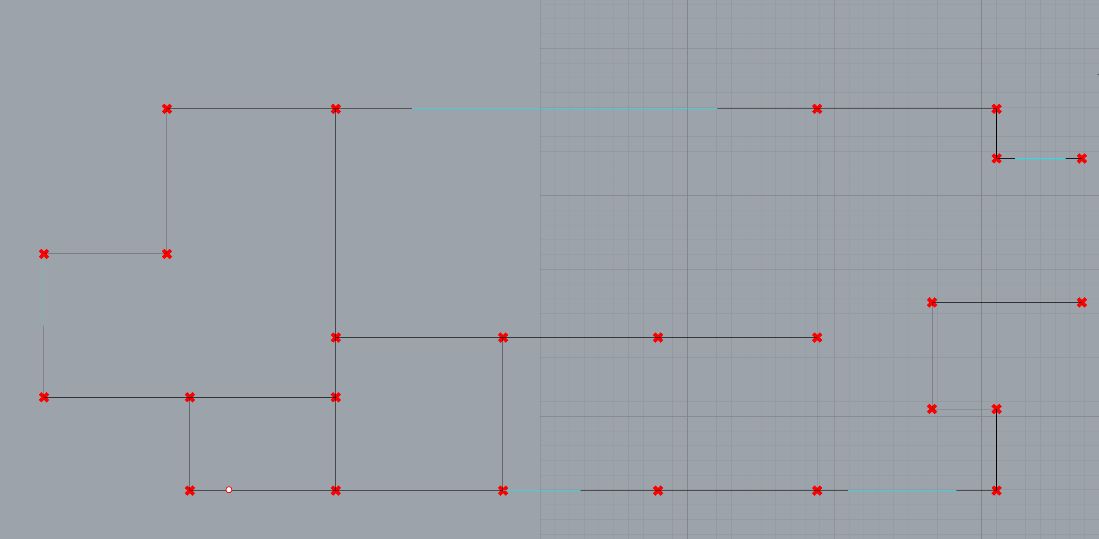
To visualise the errors that have been found:
- Deactivate the preview of the 3D zones.
- Select the issues to visualize using the drop-down menu.
- Turn ON the toggle Preview the points with errors to highlight the geometry in the Rhino canvas.

- Turn ON the toggle Move by reference point (if your floors are not drawn on top of each other) to move the points to the location of the 2D lines you created for tracing the outline.

It is to be highlighted that some issues are a follow up issue from another one, so e.g. a cleanCurve issue can lead to the need for a p2p issue.
Tip:
- The top right menu of Grasshopper window needs to look like this to see previews of the geometry. You can then zoom into the points and see the issues.
- SplitCrv is excluded from the default “all” mode because usually you don’t want to do this on your own so it's okay to let this be made automatically.*
Preview corrected curves:
the new curves, corrected, are shown or not.

Preview all floors' grid
Makes a preview of the grid lines in all floors. Be aware that if you don’t see this toggle, it is because the Layer “Gridlines” in Rhino is empty.

Preview Statistics
Show some statistics of the geometry after the algorithm is done. Handy to check the geometry after solving. Points are only evaluated inside one floor and not from floor to floor.
The Statistics section only appears if the Preview Statistic toggle is ON.
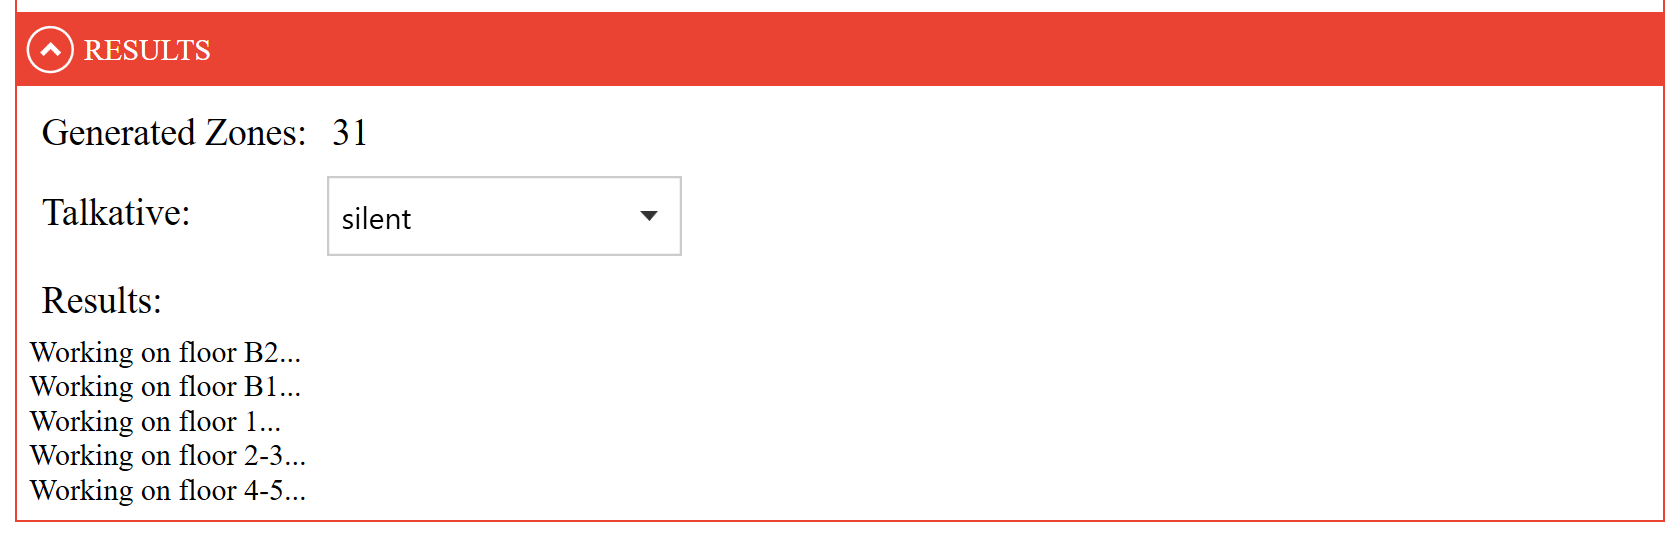
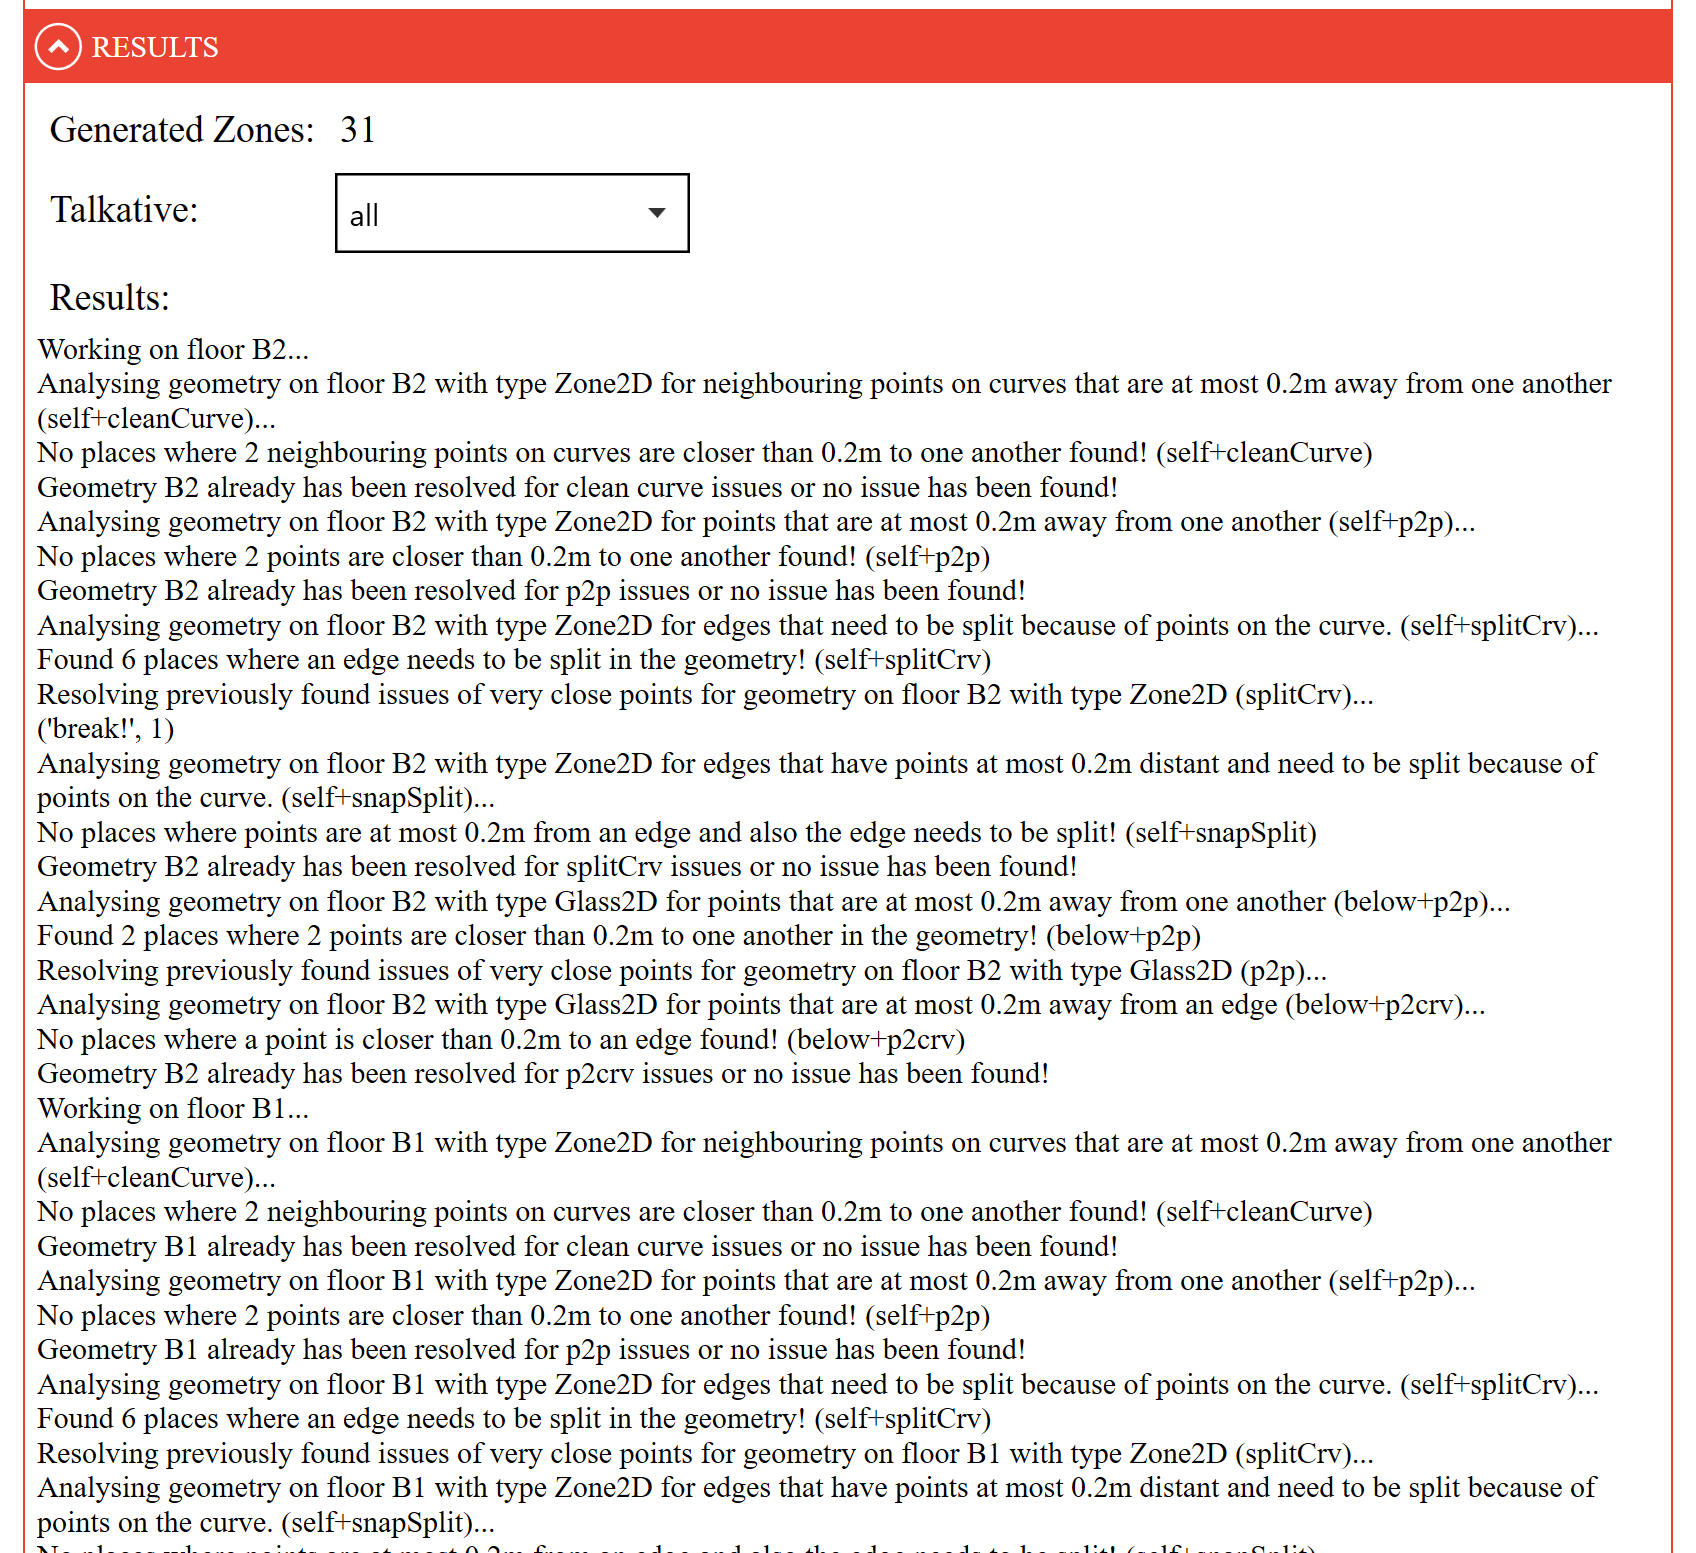
# Results section
In the Results section, you can see how many zones are generated in the project and a result of the checks the algorithm has made. You can decide how much information is displayed in the Results using the Talkative drop-down menu:
- Silent: only the most essential information is shown
- Less: part of information is shown
- All: all information is shown
Silent option:
All option:
← Model tab Window tab →